Royale High Halo Winter 2024 (Glitterfrost Halo)
2025-04-30
Call of Duty Black Ops 6 is finally here, and with it, a brand new Zombies mode and two maps to explore and uncover secrets for. Here is our walkthrough for the round-based game mode and how to prepare yourself best for the endless wave of zombies.
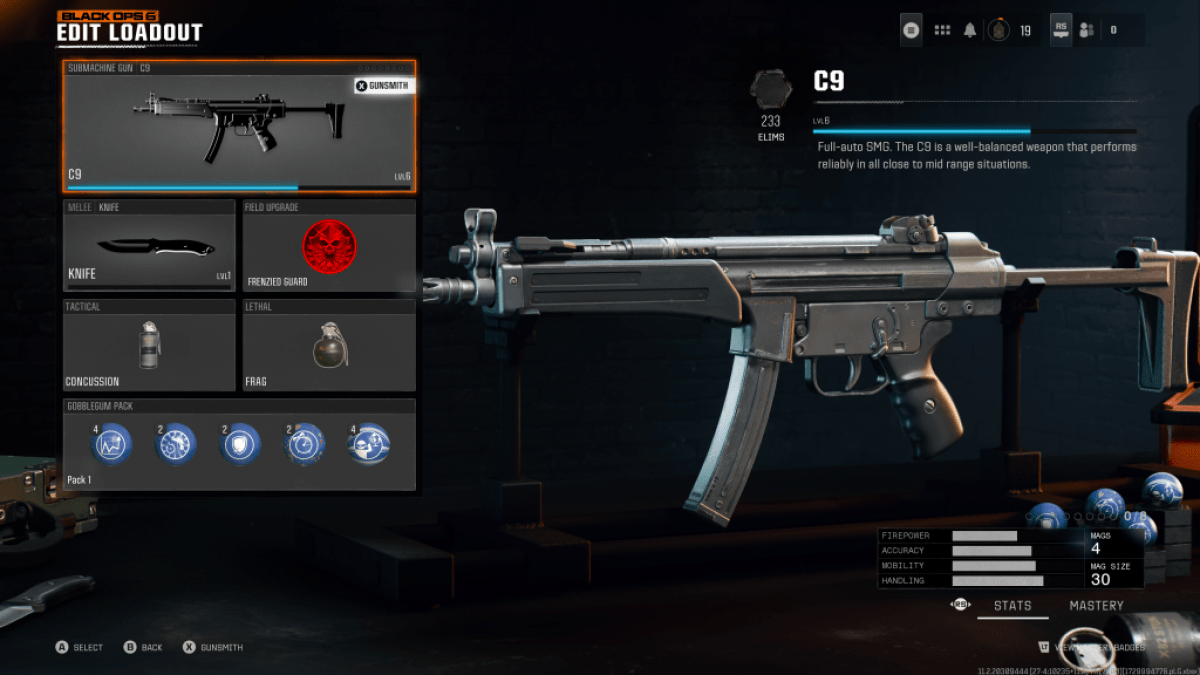
Before we give you a rundown on the two modes currently available, there are plenty of new options to go over for loadout customization in Call of Duty Black Ops 6 Zombies. For example, players are given only one primary weapon slot in Zombies, with a melee weapon being their secondary. When first starting in the mode, loadout and primary weapon customization are locked until you reach level 4, but there are a variety of presets to choose from, as always.
Besides the primary and melee weapons, Zombies loadouts also have tactical and lethal weapons to choose from, as well as a field upgrade and Gobblegum Pack. However, it’s important to note that the gun you start with isn’t very powerful when customizing your loadout before going into Zombies. There are five different weapon rarities in the game mode, and while you can Pack-a-Punch and upgrade your starting gun using salvage, buying weapons off the wall or using the mystery box serve as better options the deeper you go into your run.
Different Playstyles suit different field upgrades. If you’re running a solo match, the Aether Shroud is the recommended upgrade to equip into your loadout (though it isn’t unlocked until level 46). A great early equip that’s already the default equipment is the Energy Mine, perfect for crowd control and getting out of a sticky situation. The Healing Aura upgrade speaks for itself and is one upgrade at least one member of your squad should have equipped, which is unlocked at level 33 to heal teammates.
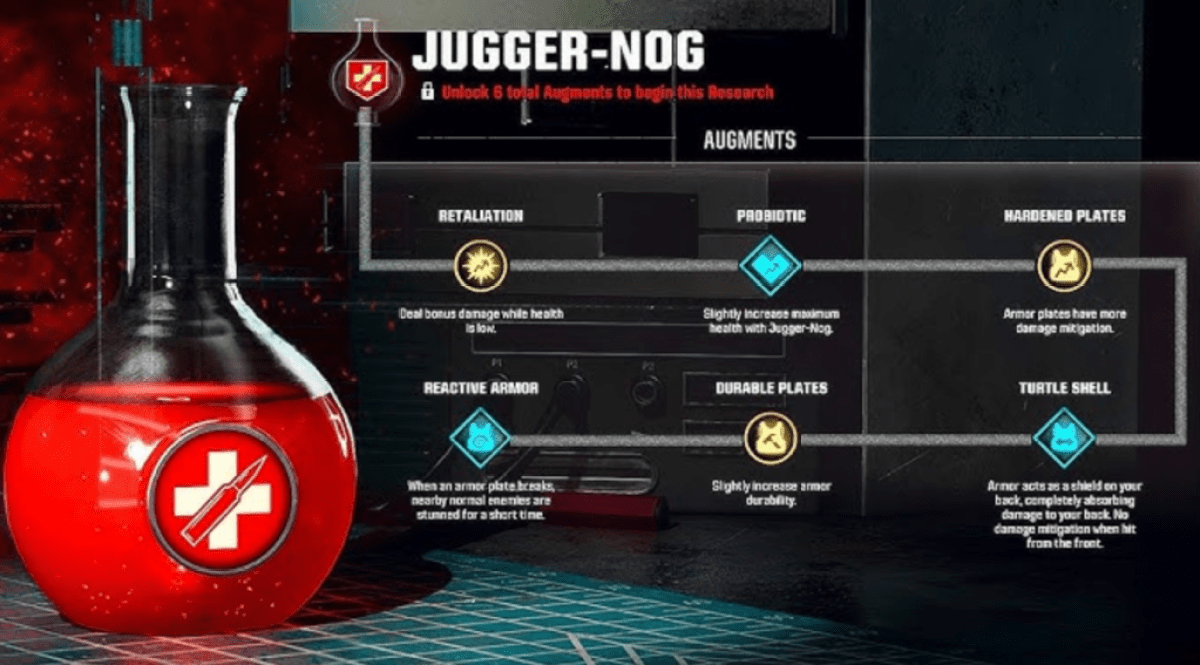
Augments, a feature introduced in Black Ops Cold War Zombies, has returned and further developed in Black Ops 6 Zombies. Augments essentially allow whatever field upgrades you equip in your loadout to be amplified and have additional perks. The Augments also increase the power of the perks and modifications you purchase in-game with your essence, giving you a leg-up against the horde.
However, Augments can’t be unlocked without “Augment Research,” a section of the “Weapons” tab in the Zombies mode. It doesn’t become unlocked until you reach level 11 in your progression through Multiplayer and Zombies. As soon as you unlock the feature, we recommend you immediately begin researching whatever arguments become available. The process of unlocking augments is a grind and can take a long time.
Given that there are 108 augments available in the game, ranging from perks to ammo mods to field upgrades, there’s plenty for players to experiment with to see which combination of augments works best for their playstyle. Again, as soon as this becomes unlocked, it’s wise to pick the first research augment available (Stamin-up) and begin playing Zombies to earn XP and earn progress towards unlocking other more valuable and powerful Augments for your loadout.

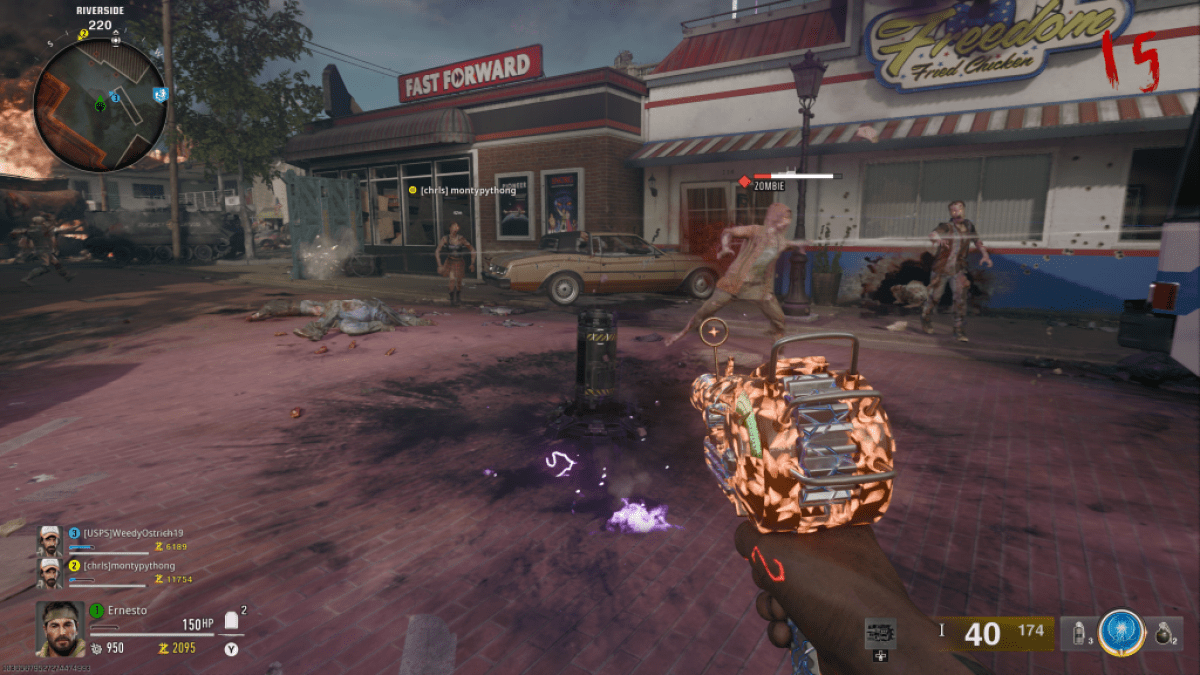
Upon starting a game of Zombies in either Liberty Falls or Terminus, players are given free rein to do whatever they please. Whether it is completing the main quest to earn rewards and XP or simply seeing how long they can survive, the Zombie game modeis a loose and fun experience.
When starting on either the Liberty Falls or Terminus Maps, players must unlock most, if not all, the locked doors to get to the truly fun perks and power-ups that will help make exfiling much easier once you finally decide to do so. In the Terminus map, it’s required to power on three specific amps to get to the Pack-a-Punch. For Liberty Falls, it’s a more straightforward process that just involves unlocking all the doors in front of you until you get to the church, where the Pack-a-Punch of that map is located.
There are also some repeated rounds that players should be aware of, which occur occasionally. Some of these, such as the infestation rounds, end with a max ammo perk to save the player time and in-game money and be prepared for the next round.
It is on the eleventh round, and every five rounds after that, players will be given the option to exfil, with a radio icon appearing on the map with the word Exfil. Simply interact with the designated point, and you’ll have to survive several waves of zombies until the helicopter arrives. That is how you Exfil in Black Ops 6 Zombies.
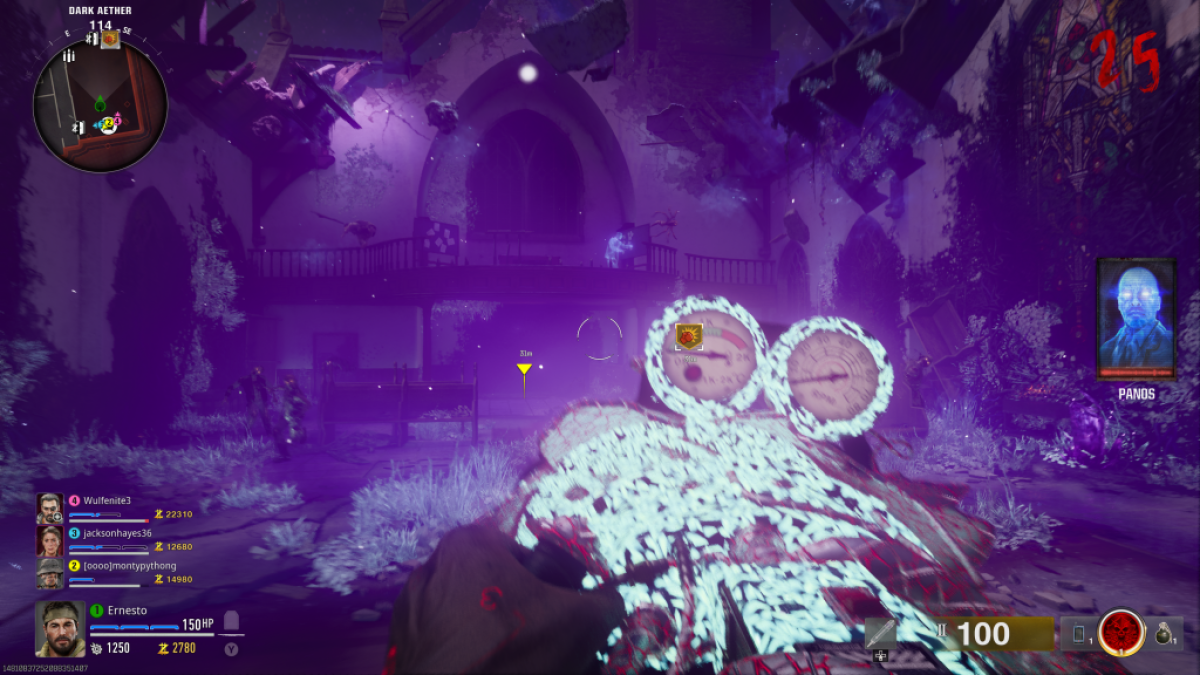
Players are treated to an opening cinematic when playing Liberty Falls in a solo game to help immerse you more into the story of Black Ops Zombies. A zombie outbreak soon takes place in the town of Liberty Falls, West Virginia. Nolan North reprises his role as the character Edward Richtofen in the cutscene, with this version of Black Ops Zombies continuing the Dark Aether Saga that began in Black Ops Cold War. Richtofen mysteriously vanishes in ominous purple smoke; the cutscene ends with the containment chamber holding the dark Aether, giving an ominous warning.
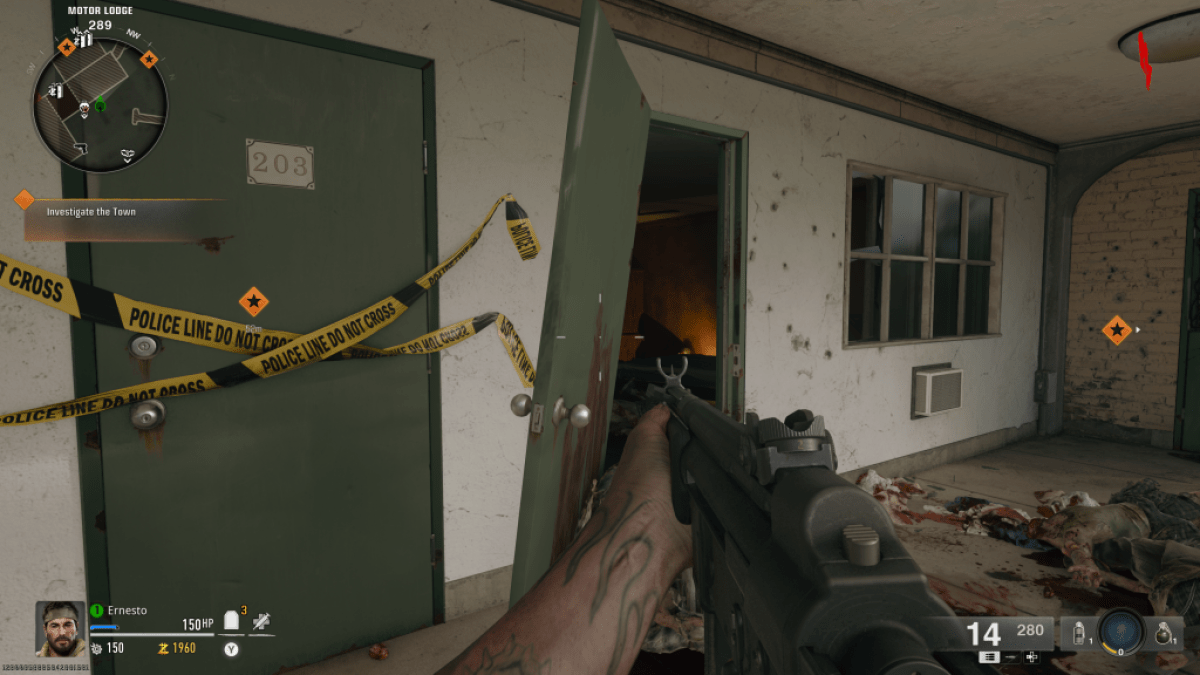
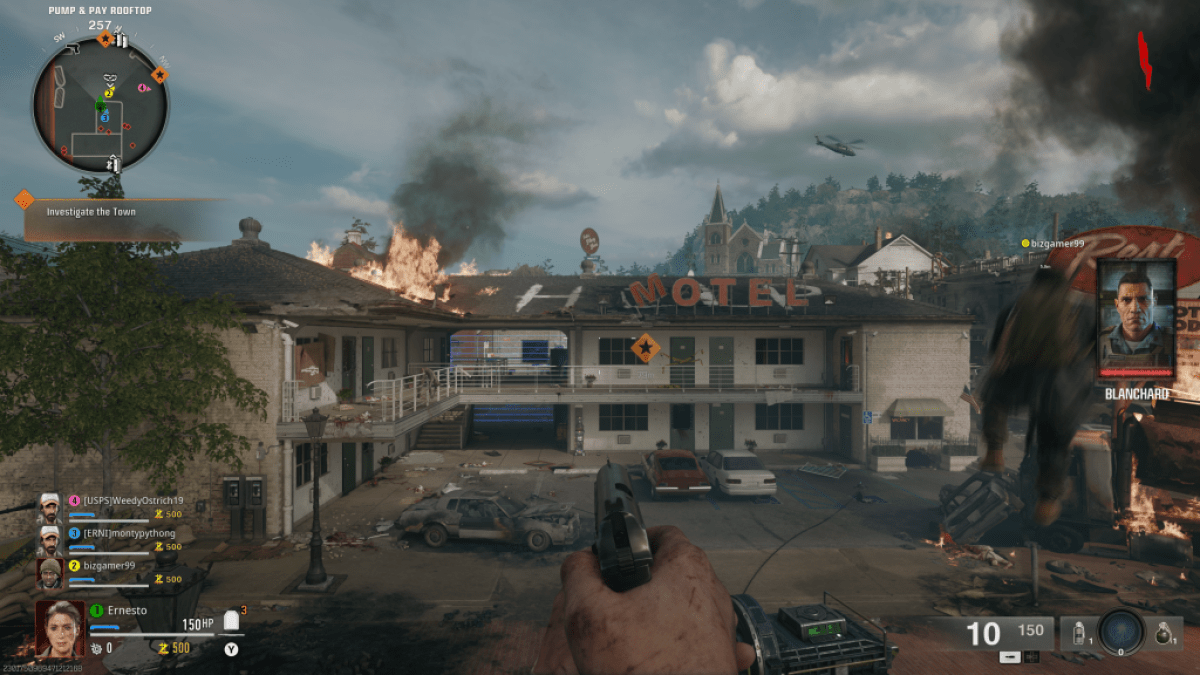
When starting in Liberty Falls, players will spawn on the roof of a building with two waypoints marked for you to make your way toward. A character named Blanchard (seen in the opening cutscene) will communicate with you, giving a rundown of the general situation. One waypoint is straight ahead, while another is towards your right side when you first spawn. Before unlocking either of those with essence earned in future rounds, it’s essential to head to the second floor of the Motel right in front of you. Going towards Room 202 will trigger a wave of zombies to burst through the door.
The earlier you enter that Motel Room, the better, as it makes killing the hordes of zombies from the room easier. After clearing the area, you can enter the room to find the blueprints for the Jet Gun. Three essential components are required for the jet gun, and we will detail them for you here in this guide.
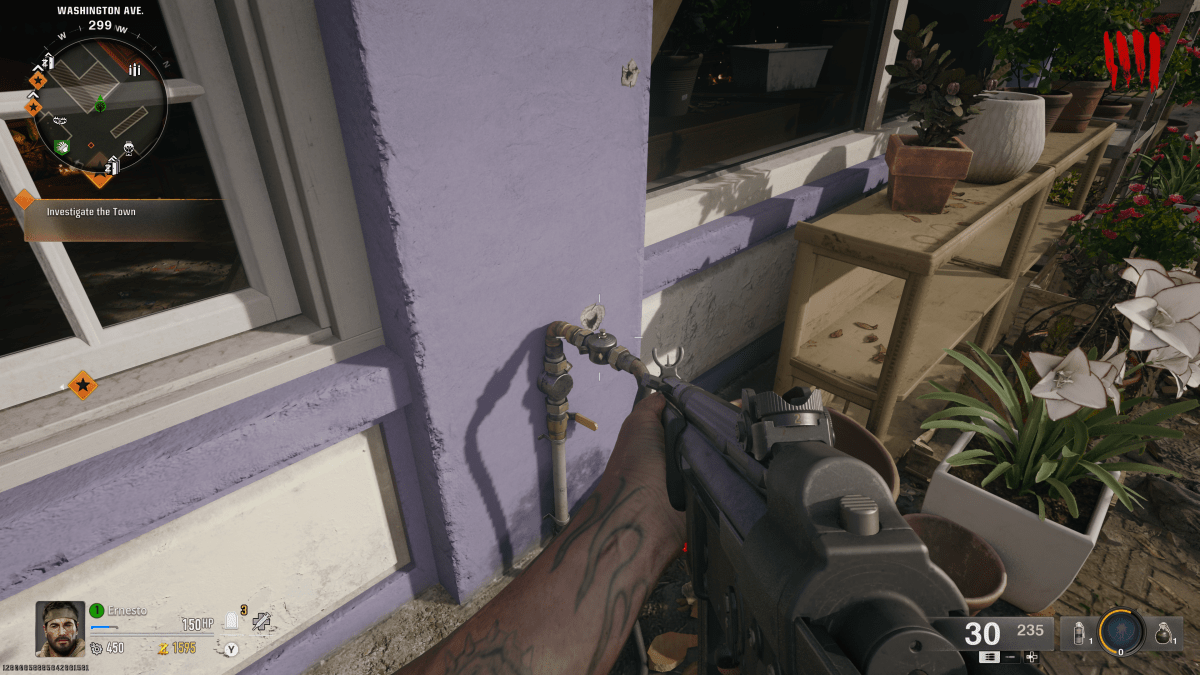
The first is the Water Pressure Gauge. To obtain this, you first need to complete some rounds to gain essence and use that to unlock the various corridors and gates blocking other points of the map. To the right of the Speed Cola perk is the Flower Shop called Lily’s Flower Pots. Next to the shop entrance is a faucet with a valve that you can take.
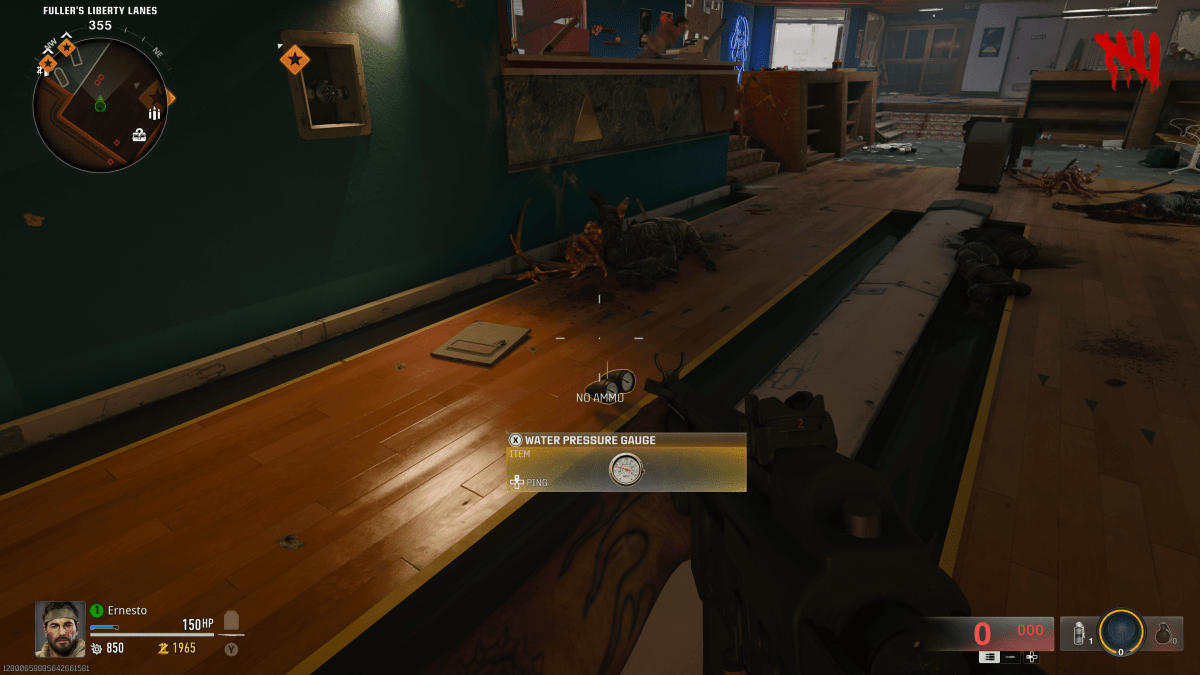
Obtaining the valve is easy enough, but the next step is the trickier part. After getting the valve, players will need to go to the Liberty Lanes Bowling Alley (where the Stamin-Up perk is located). A square white control panel is on the right wall of the Bowling Lane. Use a melee attack on the panel to open it, and you will place the valve you obtained on it to increase the water pressure.
Make sure you are well prepared with tactical weapons such as grenades. Once you put the valve in and begin turning the water pressure up, endless waves of zombies will attack you. The goal is to hold down the X button on your Xbox controller (or square button if using a Dualsense) to increase the water pressure until the valve breaks. Zombies will be attacking you the entire time, so unless you have a team protecting you, you’ll need to take quick breaks to wipe out the zombies in your immediate vicinity before continuing to increase the water pressure. Again, this stage of the Jet Gun assembly is better done in earlier rounds so the zombies are easier to kill. Once this is done, the Water Pressure gauge will fall to the floor, allowing players to pick it up.
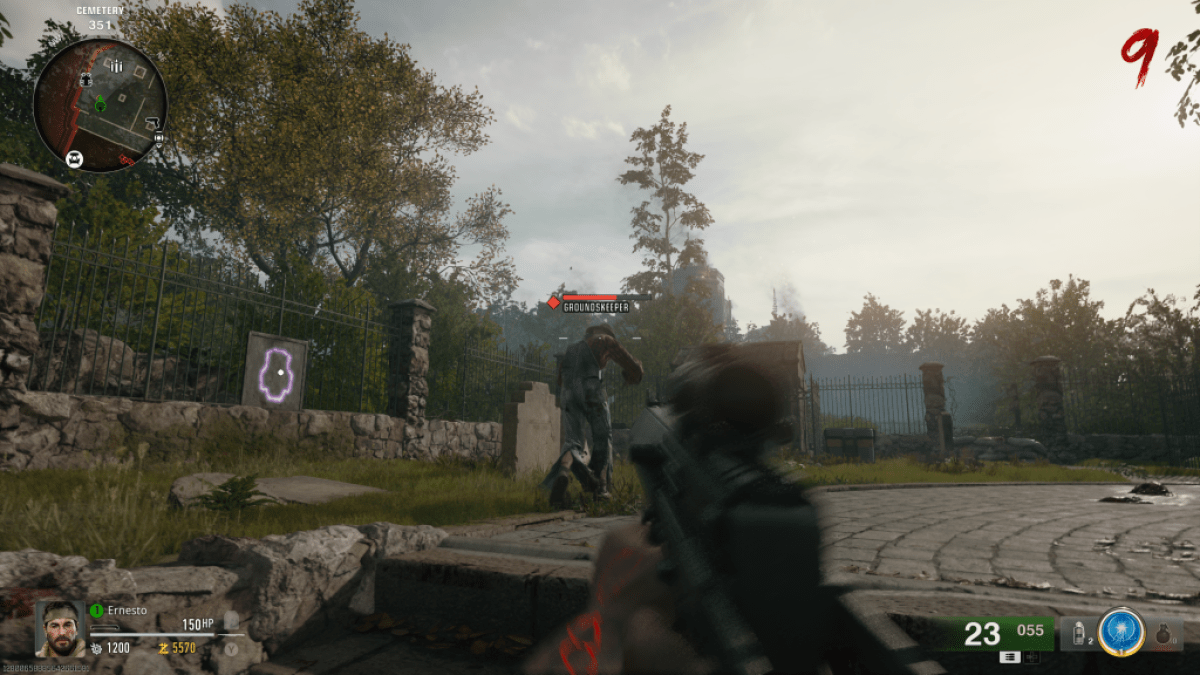
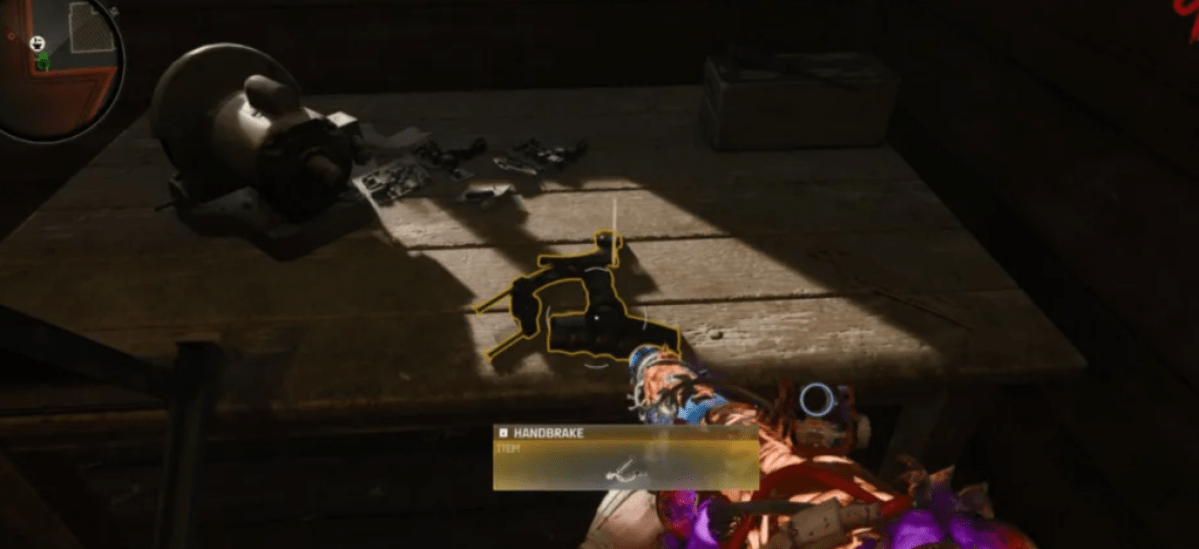
Following this, players will want to go to the cemetery (next to the Church where the Pack-a-Punch is located) and kill zombies in that area for a round or two. After some time, a special Zombie should spawn, as it will be called “Groundskeeper.” Make sure to kill this zombie right away, or else you will lose it and have to wait for it to respawn in a later round. Killing the Groundskeeper will cause it to drop a key, which you can use to unlock a shed towards the back left of the Groundskeeper’s yard location that’s next to the cemetery and blocked unless you use essence. Inside the newly unlocked shed is the second part required, the handbrake.
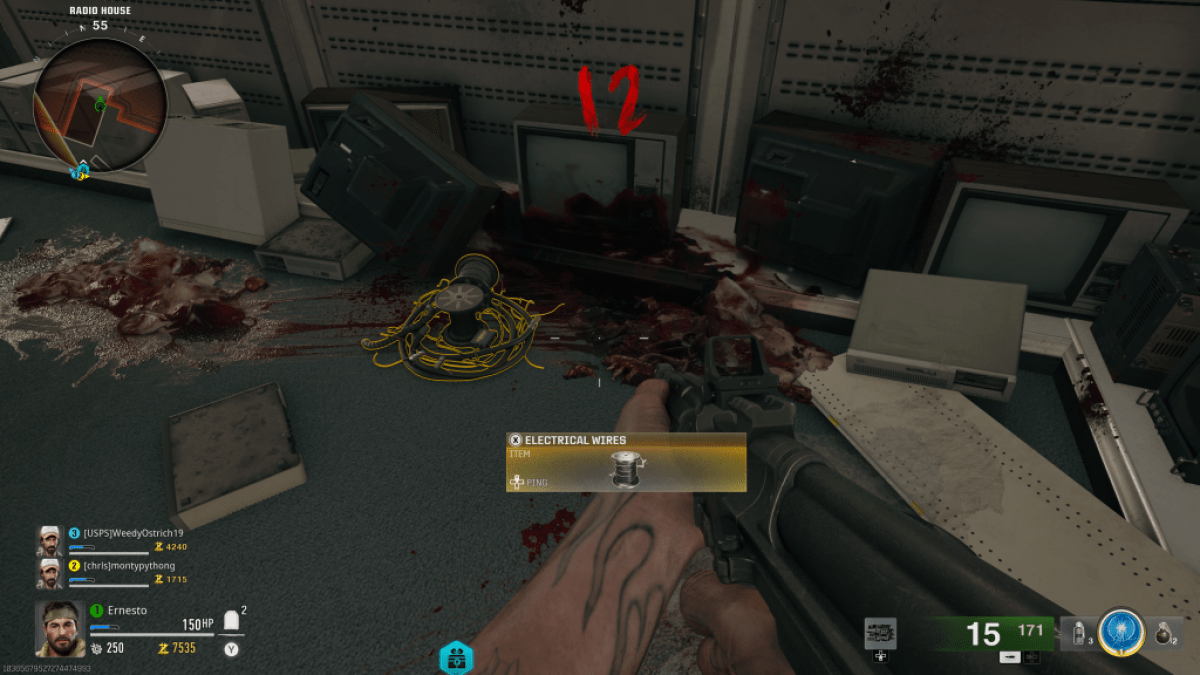
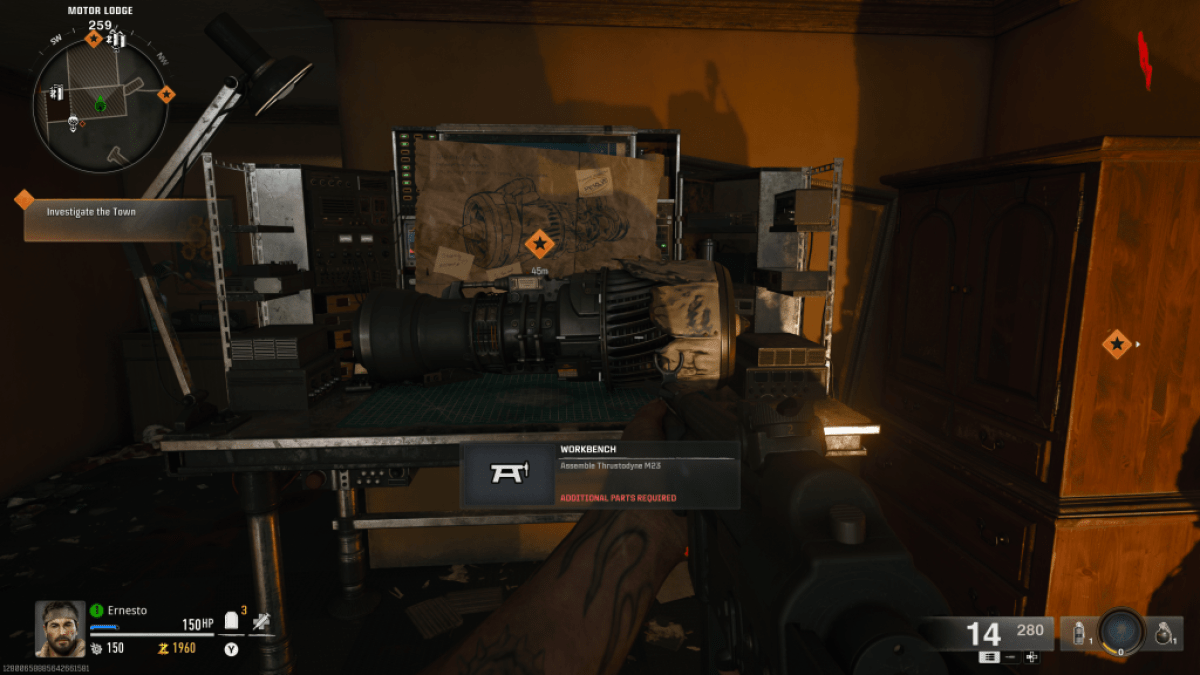
The last part required for the Jet Gun (the electrical wires) can be obtained by going inside the Radio House Store (located right across from the Quick Revive Perk). However, the bars blocking the entrance to the store can only be destroyed by a Mangler cannon. The cannon can be acquired in either one of two ways: from a workbench or by killing a Mangler. After destroying the entrance to the Radio House with the cannon, there will be piles of junk players with whom to interact, and one will eventually be the Electrical Wires.
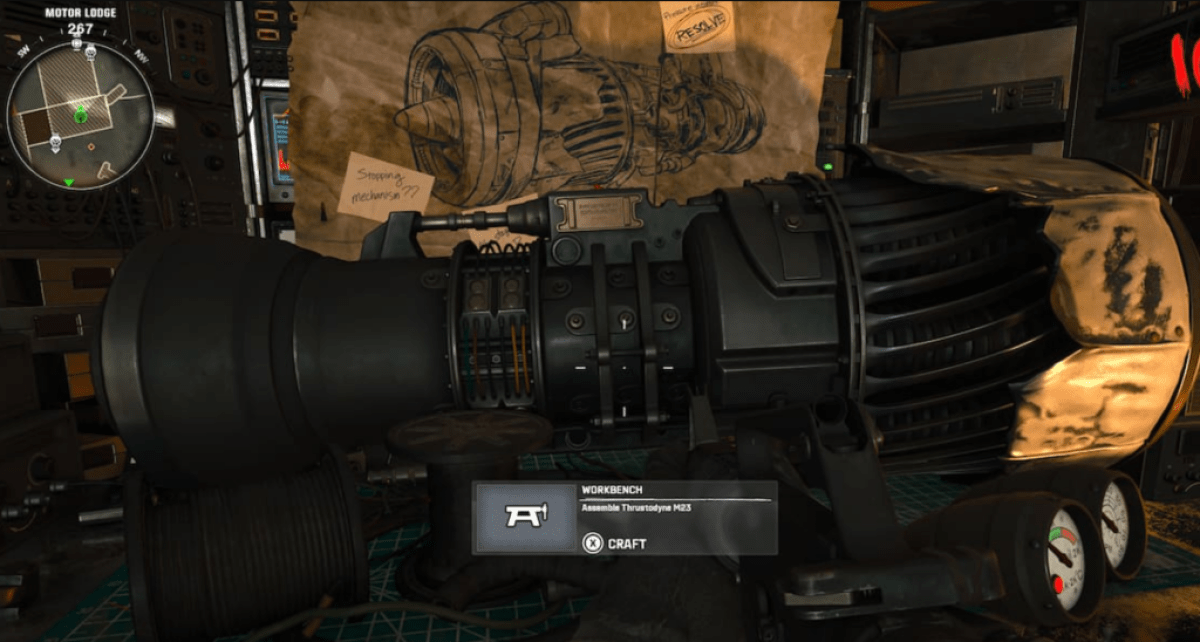
After obtaining the last part required, return to the Motel Room where you initially found the blueprints. There will be yet another horde of zombies waiting for you. Once the room is cleared, you can use the parts obtained to create the Jet Gun. This is the first major step in completing the Main Quest Line for Liberty Falls.
Related: How To Do the Bowling Easter Egg in Liberty Falls in Black Ops 6 Zombies
After obtaining the Jet Gun, players will want to return to the Church and interact with the SDG Generator to trigger a cutscene. From this point, Panos will ask you to retrieve three pieces of equipment to create the LTG Device. It’s recommended that you try to leave one Zombie alive to delay the start of the next round so that you can retrieve the three components in peace.
It’s important to note that the Jet Gun is required to retrieve the three components of the LTG device. While the Left Trigger fires a burst of air and decimates waves of zombies, the Right Trigger allows you to use the Jet Gun to inhale objects (and zombies). Here are the three locations in which to use the Jet Gun to retrieve the LTG Components:
After obtaining all three components of the LTG device, players will want to purchase the zipline located at the Liberty Falls Bank entrance to access the roof. From the roof, walk across to the left side of the rooftop, where you’ll find a workbench. Simply interact with the workbench to create the LTG Device so that you can continue with the next step.

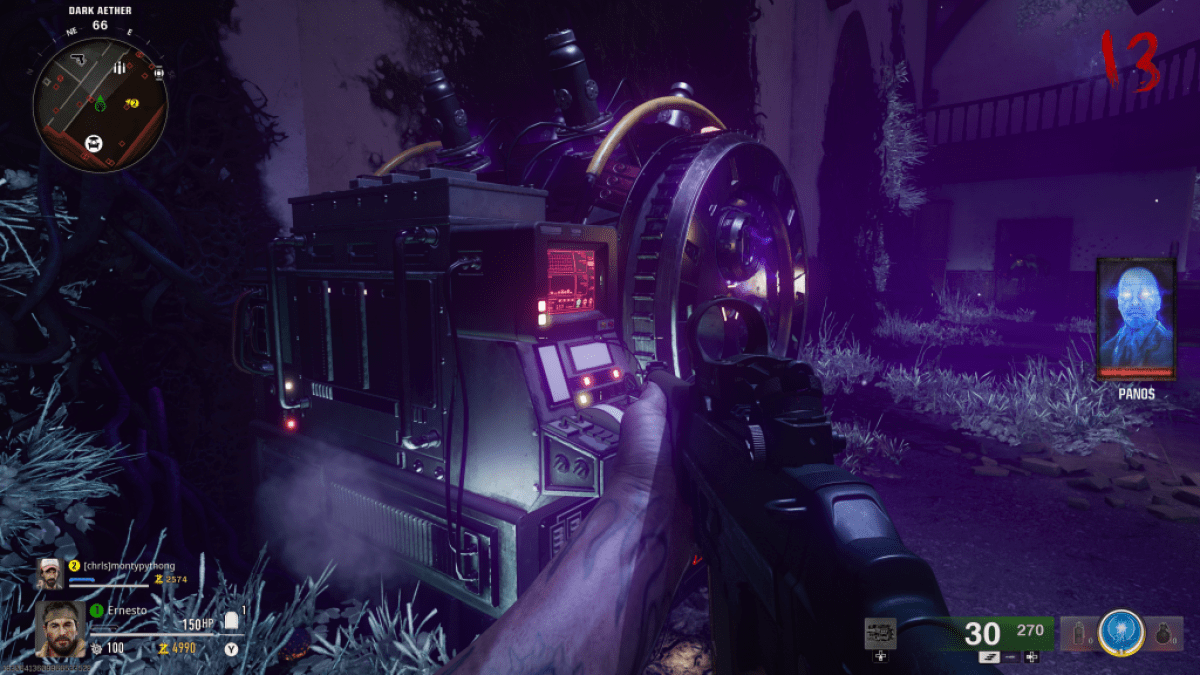
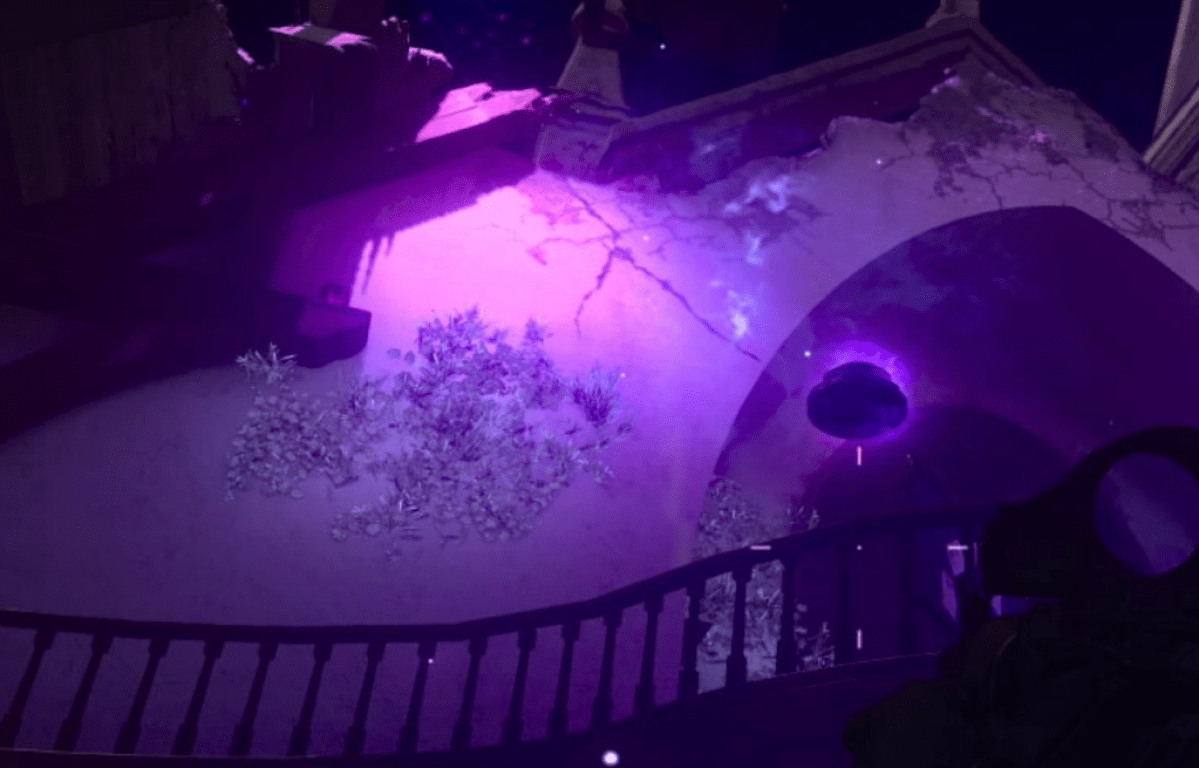
This next step for the Liberty Falls Main Quest Line may be the most difficult one yet. Following your creation of the LTG device, you’ll need to return to the church and get an Aether canister from the SDG Generator that was not sticking out before (be warned; picking this canister up disables sprint for the player). This Dark Aether Canister is empty, and it’s the player’s job to fill it up with HVT Essence. To do this, players must activate the LTG Device they assembled by interacting with the device below the Aether Storm Cloud at Riverside.
Before you go to the Aether Storm Cloud at Riverside, however, the empty Aether Cansiter you picked up from the Church should be dropped near one of the three Dark Aether Field Generator traps located at the Spawn Point (in between the Motor Lodge and the Gas Station). Don’t forget where you dropped the canister, as it’s easy to get lost or mixed up during the endless hordes of zombies.
After dropping the canister near one of the traps, go to the storm cloud at Riverside and trigger the LTG Device you assembled. A purple storm follows from the device that zombies become drawn to. However, the player can’t let the zombies go near the Portal created by the LTG device or it will be compromised. So, players must defend the portal for 60 seconds. If done successfully (and it can always be restarted if failed), a boss enemy will spawn, either a Mangler or an Abomination. After severely weakening this boss, players must trap it in the Dark Aether Field Generator that they left the empty Aether cannister in. Once the boss is killed within the vicinity of the canister AND inside the trap, its essence will go into the canister.
Players must then pick up the now-filled Aether Cannister and take it back to the church. You will only have 90 seconds to put it back in the SDG Generator, so it’s best to go through the Bowling Alley and up the stairs, as it is the fastest route. Completing this step will give players the Strauss counter tactical device that can be accessed with L1.
With the newly acquired Strauss Counter, the next step involves going to three projectors located on the Liberty Falls Map. Going up to any of the Projectors will cause the Strauss Counter to display one of three colors. Depending on what the Strauss Counter changes color to, players will need to interact with the bulb on the projector and change the color to correspond with your Counter. The combinations are as follows:
You can find the three projectors at the following locations:
After configuring each of the Projector Bulb lights (and possibly completing a round, as this portion can sometimes glitch out even when done correctly), another Aether Cannister will spawn at the gas station. It’s now time to guard another portal and capture the essence of another boss enemy.
Take the Aether Cannister that just spawned at the Gas Station, take it, and leave it near one of the Dark Aether Field Generator Traps. On the way to the Cemetery, take the LTG device you protected at Riverside as well. Simply interact with the device, and it will disappear from where it was previously placed. After placing the empty canister near a D.A.F.G. Trap, go up to the storm cloud at the cemetery, place the LTG device, and protect the portal from zombies for another 60 seconds.
After successfully defending the portal, a Boss Enemy will spawn, and you must repeat the same steps as before: lower the boss enemy’s health, and once it is low enough, lure it into the D.A.F.G trap where the Aether canister is at and kill it so its essence will transfer into the canister. With that done, you have the final canister you need and are ready for the final step. Once you put the Aether Cannister into the SDG Generator, you will be prompted to interact with the device and start the final encounter in Black Ops 6 Zombies.
With all the Dark Aether Cannisters filled and placed into the SDG Generator, all that’s left is to activate it and start the final encounter in the Liberty Falls map of Black Ops 6 Zombies. However, players should be warned: the final three waves of zombies are intense and can easily overwhelm without the proper equipment. To make sure you’re fully prepared for the final encounter, do the following:
Whenever you think you’re prepared for the final encounter, go to the Church and activate the SDG Generator. Doing so will cause you and the rest of the players in the game to be teleported and locked in the church. Players must vote to proceed with the final encounter if this isn’t done solo.
The first wave of the attack is a horde of zombies. An Elite Mangler follows this wave, and lastly, an Abomination. Given that you’re trapped in the Church, there isn’t too much space to run around and evade zombies, which is where your overpowered weapon comes into play.
After defeating all enemies, all players will be knocked (don’t worry, you didn’t do anything wrong). This will then trigger the final cutscene, and you’ll have successfully completed the Main Quest Line for Liberty Falls in Black Ops 6 Zombies.
After completion, players will receive 5000 XP and a new Weapon Camo for the Ray Gun.
Black Ops 6 Zombies‘ newest map, Citadelle Des Morts, is filled with all sorts of new Easter eggs for players to discover, with the main one among them being a new Main Quest for players to complete for tons of XP and cosmetics.
The main goal of the Citadelle Des Morts questline is to find and upgrade four swords and their incantations. After that, players will need to solve different symbolic puzzles. Keep in mind that this will all need to be done while also surviving hordes of the undead. This challenge is especially difficult with the puzzles that need to be solved while also surviving, and this guide is here to help those who don’t know where to look or how to progress the quest line.
Four-player co-op is entirely optional when playing Black Ops 6 Zombies. However, finding three other players to help you with the Citadelle Des Morts Questline is highly encouraged, as it will make it much easier to find and locate the four swords required to complete the quest line. Assigning one sword and puzzle to each player will not only make the process smoother and faster, but you also have a better chance of surviving the encounter.
The Pack-a-Punch machine must be activated to begin the Quest line, similar to the Liberty Falls and Terminus quests. The game will provide waypoints for where to go and what to do, such as using your essence to unlock certain marked doors. Eventually, you’ll encounter a door that can’t be unlocked with essence. To open it up, make your way to the battlements, rotate the lion cannon, and use it to blow up the main entrance of the castle.
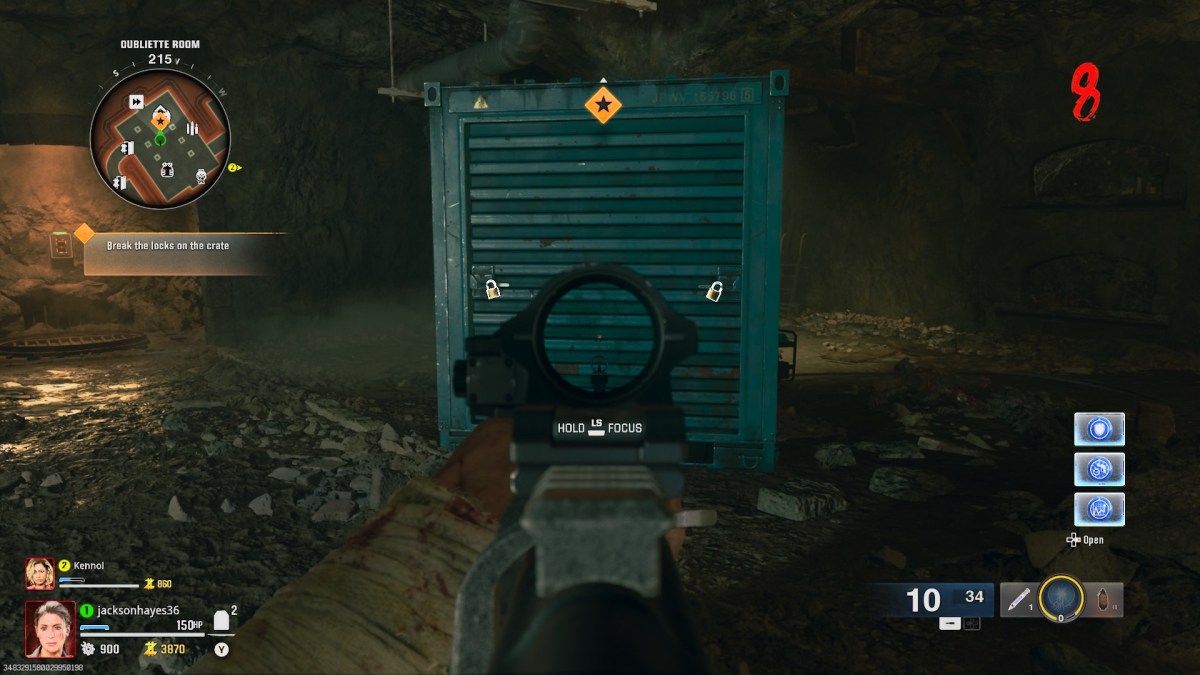
The objective markers will become visible again inside; as you go down the stairs and into the final room, players will find a container with three locks. Shoot the three locks off the container door to activate an encounter with a Doppleghast, which you must kill. Afterward, pick up the Blood Aetherium Crytal the creature drops when you kill it, and put it in the portal inside the container you opened to unlock the Pack-a-Punch Machine.
After activating the Pack-a-Punch machine, players will need to speak with Krafft in the dungeon (he’s located on the left door that you have to interact with). This will then unlock the Alchemical lab.
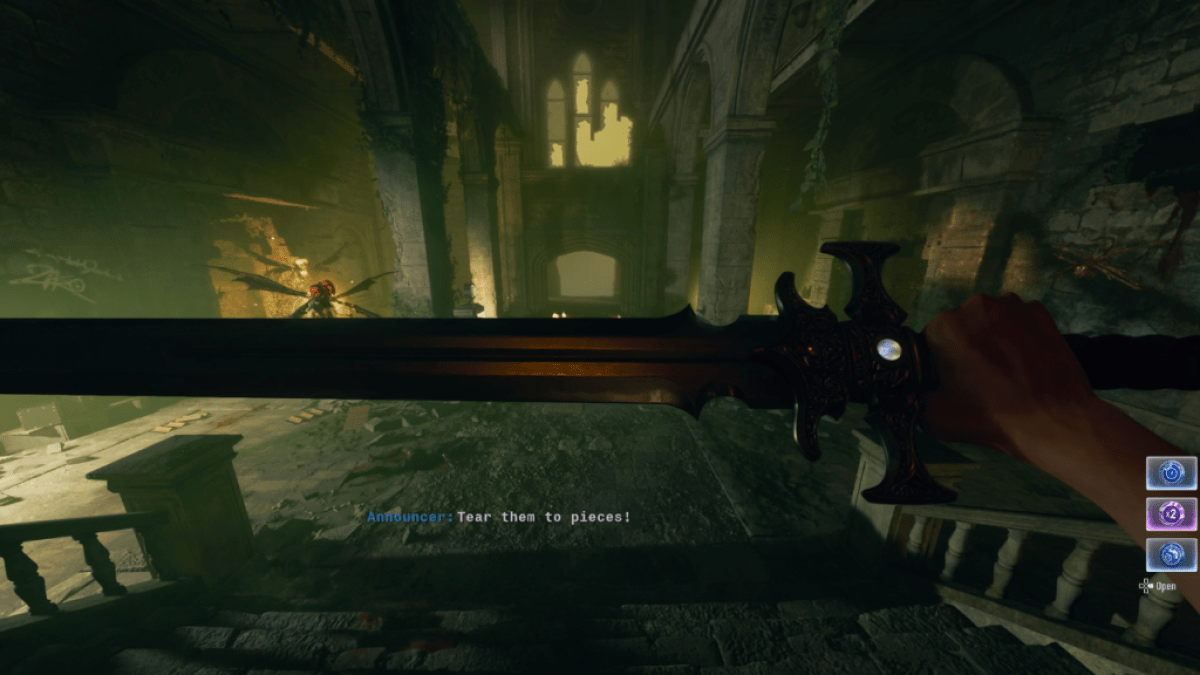
On the way back to the room where the Pack-a-Punch machine is located, players can find the four Bastard Swords, each held by suits of armor in the dining hall. Each sword relates to a different emblem on the suits of armor. In order to complete the main quest, all four swords need to be upgraded. To get the swords, you will need to kill zombies that wear medieval helmets, which only spawn after you survive past round ten. The helmeted zombies will drop stamps that can then be exchanged for the swords, and the stamps are not exclusive to any specific sword, meaning that you can unlock them in any order you want.
After exchanging a stamp for the Dragon Bastard Sword in the dining hall, take the sword to the Dining Hall Passage, where you’ll see a stone dragon statue that you must place the sword into, which will activate three braziers around the map.
From this point forward, you’ll need to locate each brazier. Whenever you find one, it will light the player on fire and slowly drain your health. When lit on fire, your objective is to return to the dragon statue from whatever brazier you interacted with and then interact with the statue to “deliver the payload.” To keep from dying on the way to the statue while you’re on fire, punching and killing zombies will completely restore your health. Below is the location of the three Braziers:
Once the third and final Brazier flame is transferred to the dragon statue, the dragon will come to life and breathe fire on the sword, transforming it into Caliburn, and you’ll have your first upgraded sword.
After getting another stamp and exchanging it for the Stag Bastard sword. However, three lightning rods must first be recovered throughout the Citadelle Des Morts map before we can upgrade this sword. The three lightning rods are in the following locations:
After obtaining all three lightning rods, go to the Hillside Ramparts, and on the left side of the location, you’ll see a vase-shaped object. Interact with it to place all three rods, which will cause a thunderstorm in that area. From here, infinite zombies will continue to attack you in the area, and players must kill zombies with the Stag sword.
Killing zombies will cause the Stag sword to become imbued with lightning, which you must then use to hit the lightning rods to charge it up. This must be done three times in a row to power up all three rods. Once this is completed and all three rods glow with electricity, place the stag sword into the center of the vase, where it will slowly charge up and become upgraded to the sword Durendal.
After getting another stamp and exchanging it for the Raven Bastard Sword, go to the Alchemical Lab. Now, here is where things get tricky; there is an animal skull displayed somewhere in the lab, though the location and type of skull change every game. So, while this guide can’t tell you exactly where it is, it will either be on one of the bookshelves, on one of the desks, or somewhere in the vicinity of these two locations.
After collecting the skull, players must return to the spawn area, reach the Tavern Cellar, and insert the skull into the circular carvings on the wall of the Tavern Cellar, as well as the Raven sword. Doing this will activate a puzzle. Depending on the type of animal skull you have, you will need to move the symbols in the innermost circle on the wall to the appropriate element and the outermost circles to the appropriate zodiac sign that correlates to your animal. Reddit User Bubbly_Parsley_6651 provided a helpful chart online that details what symbols go with which Zodiac signs to make it easier. All the possible solutions are as follows:
Once you enter the correct combination of symbols into the circular puzzle, a purple portal will open on the floor of the Tavern cellar, along with floating orbs that follow you, and cause damage if they touch you. Be careful not to let the orbs touch you, as they will not respawn until the next round. The goal is to control your movements so that the orbs eventually fall into the portal on the floor.
If done successfully, a second portal and more floating orbs will spawn in the Tavern, where you must repeat the process, which will cause a third and final portal and set of orbs to spawn on the second floor of the Tavern. Once all of them are put in successfully, follow the purple orb back down into the cellar, where it will upgrade the Raven sword into the Balmug.
After getting another stamp and exchanging it for the Lion Bastard Sword, players will want to go toward where the Speed Cola perk is in the upper village. Going down the lower ramp and in the small tunnel, there will be a door with a lion’s head on it, which you must hit with the Lion Bastard Sword via melee attack. Every time you do this, a glowing, flying parasite will spawn that you have to kill with the sword, which will glow yellow every time you successfully do so.
Simply hit the door every time you kill a parasite to reveal a new glowing symbol on the door. Once there is a symbol on every corner of the door, melee it once more to “knock” on it, which will then teleport you into a sanctuary with a pedestal to place the Lion Sword in.
Placing the sword into the pedestal will trigger various symbols to light up and spread throughout the sanctuary. The goal for the player is to see which symbol engraved on the pedestal is glowing, then shoot that corresponding symbol floating somewhere in the Sanctuary. Rinse and repeat this until you’ve matched all four symbols. Once this is completed, you’ll have upgraded the Lion Bastard Sword to Solais.
To find the four torn page fragments, go into the Sitting Room of the castle (you’ll know it because it’s where the Stamin-Up machine is). To save time on this puzzle, be sure to carefully retrieve the page fragments based on where they are placed in the room from the left side to the right. The spawn points for these glowing pages change every match and can be tricky to find as they are surprisingly well hidden.
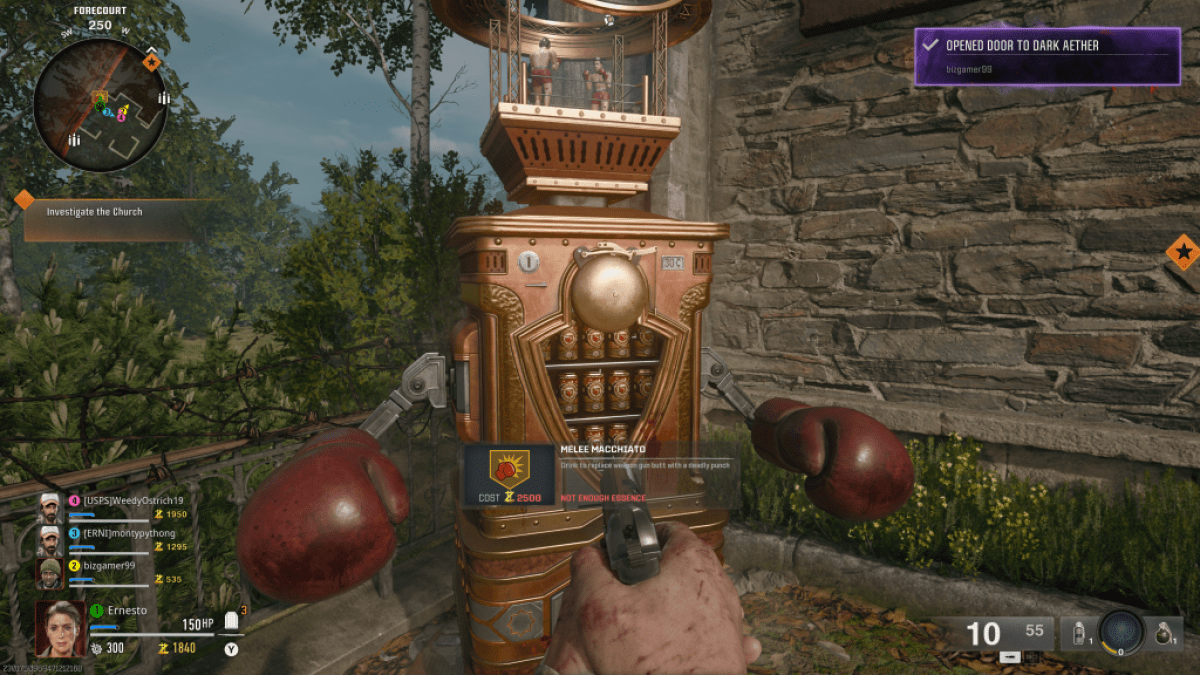
After collecting all four pages, ensure you have the Melee Macchiato perk, which you must use when going down into the Undercroft. Hit the wall at the end of the room, which looks obviously breakable and differently shaded, revealing a new puzzle and wall of symbols.
This puzzle can be tricky simply because it requires memorizing six different symbols. After revealing the hidden wall with the various symbols, you must return to the spawn area and proceed to the Tavern, where you can find six bottles with the Roman numerals I through VI on them. Each bottle has a different symbol, and the goal is to memorize which bottle has which symbol and shoot the corresponding symbols on the wall in numerical order. Be careful, though, as every time you shoot the correct symbol, the wall changes the order in which it has these symbols.
The bottles in the tavern are as follows:
Instead of constantly going back up and down from the Tavern to the Undercroft, players should take screenshots of each bottle to know which symbols to shoot in order. After shooting all six symbols on the wall in the correct order, a red orb will appear and reveal a hidden slot next to the wall puzzle containing a book. Place the four torn page fragments into the book to begin the next puzzle.
After placing the four torn pages onto the hidden book, four glowing red symbols will appear, each correlating to four different points of traps that will now be activated on the Citadelle Des Morts map. The four symbols in the book differ in every game, so we can’t definitively tell you where to go.
To complete this part of the puzzle, you need to activate the traps that correspond with the symbols in the book in the correct order. You must do the trap for the top left page first, then the bottom left symbol, then the top right symbol, and lastly, the bottom right. When locating these power trap symbols on the map, you’ll know you’re at the correct one when it is outlined in white.
Interact with the symbol on the floor and stay in the circle, allowing you to fire special bullets from your weapons. After killing a certain amount of zombies while standing on the symbol, you’ll get dialogue from Krafft indicating you completed it. The symbols will disappear from the book as you complete each power trap.
Once the Symbol Power Traps are all completed, you’ll want to locate four different Animal Ritual Items, as well as upgrade them. Here are the locations of the four animal ritual items, as well as how to upgrade them:
After collecting the four ritual items as well as upgrading whichever ones are necessary, four golden circles will appear around the map. They work similarly to the Book Symbols traps mentioned earlier, and you must take each item and place it in the appropriate section, which will trigger waves of zombies you have to kill to complete the upgrades for each item. The Golden Circle locations are as follows;
Once all the above steps are done correctly, go to the Undercroft stairs, where the wall will now show four animal symbols (each represents one of the four upgraded swords) and a Roman numeral next to each one. As with several other steps here, the Roman numerical sequence for each animal symbol is randomized in each game. Be sure to memorize which animal goes first according to the numbers and the color associated with the animal symbol.
Depending on the order, you’ll want to find the box associated with the upgraded sword on the map. Unlock the box with the sword, pick up the incantation related to it, and return to the Dining Hall, where you’ll use the incantation on the armor as well as place the sword on the suit of armor, which will cause it to raise its arm as well as making it glow gold (if done correctly). Here are the locations of each incantation box:
Once the incantations and swords are placed on each suit of armor (in the correct order depending on the animal symbol that spawned for you in the Undercroft), a Mystic Orb will spawn in the center of the Dining Hall.
Now that you have the mystic orb, you must take the orb to four different locations around the Citadelle Des Morts map and complete elemental challenges to charge the Orb. For once, it doesn’t matter what order you do these challenges. There will be small circular metal components sticking out of the wall where you will need to place the Orb to start the challenge, located in the following areas:
After what will undoubtedly be twenty-plus rounds of zombies, all of these extensive and tedious steps will finally be completed with the mystic orbs’ charging. Before triggering the final encounter, ensure you have all the perks unlocked, as well as whatever Pack-a-Punched weapons you need for the final boss. Once you’re good and ready, take the charged orb and place it in the wall where the Undercroft stairs are located, at the center of the four animal symbols. This will then give you the Guardian Key, which you must take to the statue in the town center. This will then trigger the final boss fight.
From here, it’s entirely up to you to vanquish the Guardian in Citadelle des Morts, which will then complete the exhaustive main quest line of the zombie map in Black Ops 6 Zombies.
Completing the quest line will reward you with the Jackknife Operator Skin for Weaver, 5,000 XP, and a calling card.
Call of Duty: Black Ops 6isavailable now on PlayStation, Xbox, and PC.
The above article was updated on 12/31/2024 by the original author to include the Citadelle des Morts Quest in Black Ops 6 Zombies.
Royale High Halo Winter 2024 (Glitterfrost Halo)
How to get an Egg of the King in Anime Adventures
Beast Force Trello and Discord Links
How to Save Your Outfits in Dress to Impress (DTI)
The Escapist’s Best Games of 2024
The Best Horror Games of 2024
How to become an Electrician in BitLife
How to get Energy Nature Scrolls in Jujutsu Infinite
A Universal Time Christmas Update 4.1 Guide (AUT)
Roblox Dig It Items Collection